Why Sealcoating Is Important For Your Parking Lot

Asphalt Sealcoating is a crucial part of the maintenance process for your parking lot. It provides a protective coating against UV rays, water, gasoline leaks and other oxidizing substances that cause asphalt to deteriorate over time.

Sealcoating

It replenishes oils and gives faded asphalt a rich black finish that improves the look of your property and increases its value. Visit https://www.rochesternysealcoating.com/ to learn more.

Asphalt pavement is made from a mixture of aggregate, such as gravel and sand, mixed with petroleum-based binder. The binding agent is what makes the asphalt flexible and pliable enough to handle traffic loads and temperature fluctuations. However, the binder can deteriorate quickly when water, gas, and other chemicals come into contact with it. Seal coating prevents this from happening by creating a protective barrier for your asphalt.

Moreover, the asphalt surface is protected against the harmful UV rays of the sun. The dark colored material that is used for seal coating absorbs the UV rays and keeps your pavement from fading and getting dry. It also helps the asphalt last longer by keeping it pliable and fresh.

In addition, the seal coat acts as a barrier to chemical leaks that are common in parking lots and roadways. Motor oil and gasoline leaks are harmful to your asphalt because they will contaminate the petroleum binder, causing it to become brittle and prone to cracking and crumbling. When the asphalt is brittle, it can no longer handle the pressure of vehicles and will break apart from the bottom layer.

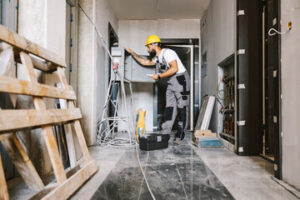
Before you can apply a new sealcoat, the old one must be properly cleaned to remove any dirt or debris that could interfere with the adhesion of the new coat. You can use a broom or brush to remove any loose dirt, moss, or other contaminants from the asphalt pavement. Also, it is important to repair any damaged or defective areas of your asphalt pavement prior to applying the sealcoat. Our best selling asphalt crack filler machines can help you do this job efficiently and effectively.

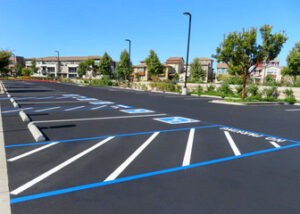
Enhances the Appearance

As asphalt ages, it can begin to fade in color. A regular sealcoating process can prevent this, preserving your pavement’s appearance. The asphalt surface looks refreshed and new when sealcoated, giving it a dark finish that boosts curb appeal. This is especially important for commercial properties looking to attract customers, as well as homeowners wishing to maintain or increase their property value.

Asphalt pavements are subject to damage from environmental factors, including water, sunlight, oil, and chemical spills. Over time, these elements can cause cracks, potholes, and other imperfections in the surface. Sealcoating protects these surfaces by creating a barrier that guards against oxidation, water penetration, and the freeze-thaw cycle. Sealcoating is an essential step in asphalt maintenance, helping to extend its lifespan and protect it from environmental damage.

Whether used as a driveway, parking lot, or other pavement surface, asphalt requires regular maintenance to keep it in top condition. Sealcoating is one of the most effective ways to preserve your paved surfaces, helping you avoid costly repairs and replacements in the future. This preventative maintenance can save you money on a large scale, making it an excellent investment in your property’s longevity.

Before applying a seal coat, it is crucial to power wash the surface and remove any oil spots or stains. This will ensure the application of a clean, uniform sealant. The proper equipment is also required to safely and effectively apply the sealant. This is an unruly job that involves handling liquid chemicals, and should only be performed by qualified professionals who understand the safety issues involved with working with these substances. Refined coal tar, which is an ingredient in many sealant formulations, creates fumes during drying that can pose health risks if workers are not properly outfitted and protected.

Prevents Water Damage

Water damage to asphalt is a serious problem that erodes the graded foundation that supports your pavement. Asphalt oxidizes under the sun, weakening it and leaving openings that allow moisture to penetrate the surface and degrade the underlying base. The result is cracking and sinking that eventually leads to potholes. Sealcoating prevents this degradation by protecting the asphalt from UV rays and minimizing moisture penetration.

Humidity is another factor that impacts the sealcoating process. The humidity level must be low for the material to dry. If the surface you need to be sealed is covered in fog, contractors will have to wait for it to clear before starting the project. The same goes for rain. Rain prevents the sealcoat from adhering to the underlying asphalt and can ruin your investment.

It’s essential that you block off areas where the sealcoating is applied until it dries completely. If you don’t, people will walk or drive on it and could dislodge the material, destroying all of your hard work. Ideally, you should have signs that warn people to stay off of the blacktop until it dries, as well.

Sealcoating also helps to prevent oil spills by creating an impermeable barrier on the asphalt. This layer keeps chemicals and oils from penetrating the underlying surface and allows you to remove these substances without damaging your pavement. This protection is especially important for commercial property owners, as these materials are a significant source of pollution and can be dangerous to people’s health. By keeping them from soaking into the pavement, you can protect your employees, visitors, and customers from these dangers. By taking these steps, you can ensure that your pavement lasts for as long as possible and avoid expensive repair costs.

Prevents Oil Spills

The asphalt used in pavement is a by-product of petroleum. Its chemical structure easily dissolves other products that are derived from petroleum such as gasoline, diesel fuel, motor oil and grease. When these substances seep onto your asphalt surface they penetrate into the lower layers of the paving and break down the asphalt binder that holds the aggregate together. This can cause the pavement to crumble, crack and eventually deteriorate. Sealcoating creates a barrier between these chemicals and your asphalt and protects the pavement from further damage.

Oil stains on your asphalt look unsightly, but even worse is the damage they can do to the pavement. The petrochemicals in the oils will dissolve the asphalt binder and destroy the base layer of your pavement. Sealcoating prevents these petrochemicals from penetrating the pavement and saving you money in repair costs.

While Sealcoating saves you money by preventing damage, it cannot fix existing chips or cracks in your pavement. These damages must be repaired by repaving or patching the area. Without addressing these damages they will become larger and require more costly repairs in the future. Sealcoating can prevent the deterioration of your pavement and extend the life of your investment.

Preparation and Application of the Sealant

Before a seal coating job can begin the surface needs to be thoroughly cleaned. This is done by power washing and/or scrubbing the area. This process can take a full day to complete. Then it must dry for 24 hours before vehicles can drive on the newly sealed surface.

Aside from cleaning the surface, workers must wear the proper personal protective equipment (PPE) while applying the sealant. This includes boots, face masks, gloves and safety glasses to prevent exposure to harmful particles and fumes.

Saves Money

Sealcoating may seem like an unnecessary expense but it is a financially prudent strategy that reduces the need for costly repairs. Studies show that for every dollar spent on asphalt maintenance, the owner saves $8 to $10 in repair costs down the road.

Over time, UV rays can cause your blacktop to fade from deep black to gray or brown. In addition, they deteriorate the asphalt surface and damage the aggregate underneath. Keeping the surface protected with a layer of sealant can slow this process and prolong the life of your pavement.

Cracks and potholes create tripping hazards that can cost your business money. Trips and falls lead to lawsuits and property damage. In addition, damaged surfaces make it difficult to determine safe areas for parking and traffic flow, increasing the risk of accidents and vehicle damage. Regular sealcoating protects your asphalt and reduces these risks, preventing expensive lawsuits.

Another way sealcoating saves you money is by preventing repaving. Without a protective layer of sealant, cracks and breaks will worsen over time, eventually requiring you to repave the entire area. Repaving costs between $1-$4 per square foot, so a small investment in sealcoating can save you a lot of money in the long run.

A well-maintained asphalt surface not only increases the value of your property, it also sends a message to customers and tenants that you are committed to keeping the premises in good condition. With professional sealcoating, you can extend the lifespan of your asphalt and improve its appearance with minimal effort.

What Does a Residential Electrician Do?

Residential electrician works on low-voltage systems such as doorbells, thermostats, landscape lighting and other electrical fixtures inside of housing units. They may also work on wiring for new construction projects.

Electrician

They use hand and power tools, read blueprints, and install wiring to adhere to local and national building codes. They also troubleshoot problems using a variety of testing devices and problem-solving skills.

Residential electricians are in charge of installing electrical wiring for a home. They also need to know how to troubleshoot, repair and replace wiring when necessary. For instance, an electrical fixture may begin to act up and stop working, or a circuit might rewire and cause a fire hazard in the house.

When a homeowner encounters any of these issues, the first thing that a residential electrician would do is examine the electrical fixtures to determine the problem. They do this by examining the measurable parameters of each fixture to figure out what’s wrong with them.

For example, if a light fixture is brighter or darker than the rest of the lights in the house, it indicates that there is a problem with the power rating of that specific lighting fixture. Similarly, if one outlet is working but the other isn’t, it suggests that the wires connected to the fixture are not carrying enough current to function properly.

Another common issue that residential electricians handle is recurrent tripping of the main breaker of a house. This occurs when there is too much electric load on a single circuit. A licensed electrician will fix this issue by reducing the total electrical load in the house or installing a larger service panel with new branch circuits that serve areas of heavy usage and help share the load across multiple wires.

Residential electricians must know how to remove and replace old knob and tube (K&T) wiring in older homes with up-to-date industry-standard wiring. They also need to be able to work with and read building plans and use a variety of tools, including an electronic voltage tester. Additionally, they need to follow proper safety precautions when working with electricity to prevent electrocution.

Troubleshooting

During the time that homeowners own their homes, they will often encounter a variety of electrical issues. Fortunately, many of these problems are easy to troubleshoot and repair. If a circuit goes dead, for example, it is usually due to faulty equipment or wiring. To help locate the source of the problem, the electrician should first turn off all wall switches and unplug appliances from the outlets that are connected to that particular circuit. They can then check each device and receptacle on that circuit for signs of a short in the junction or receptacle box or in the cable itself.

Another common electrical issue involves flickering lights. While Hollywood movies may make us think that this is a sign of ghosts, it’s more likely to be caused by loose or worn-out connections. Depending on where the flickering is happening, the electrician can often fix this issue without too much trouble. However, if the problem is widespread, it will be necessary to trace the problem back to its source.

Residential electricians also use their skills to diagnose electrical problems and ensure that the electrical systems they install adhere to local and national codes. They must be able to read and interpret blueprints and technical drawings as well as work with devices such as a multimeter, voltmeter, ohmmeter, and cable tracers to detect and solve these issues. Additionally, they need to know how to install all types of lighting fixtures and other electrical components. This includes installing GFCI outlets and replacing old or damaged ones. They also need to understand the importance of conducting regular maintenance inspections to prevent fires or electrocution.

Repairing Wiring

A residential electrician will repair wiring that has been damaged. This may include frayed or cut wires, bare spots where the insulation has broken off, or loose connections that create heat and present a fire hazard. They will use a multimeter to test for continuity and make sure that the wiring is properly connected to receptacle outlets, light switches and appliances.

Electrical wires run through a house and connect to outlets, lights, appliances, smoke detectors, GFCI’s (ground fault circuit interrupters) and more. Electricians must adhere to state and local electrical standards when working on residential buildings.

When repairing wires, the electrician must first shut off power to the fixture or circuit. This will allow them to work safely and avoid damage. They will then remove any insulation and clean any exposed strands of the wire.

Once the exposed strands are cleaned, they can be soldered to a new connection. This is done by melting a small amount of metal onto the exposed wire with a soldering iron. This is an important part of the repair process, as it ensures a safe and strong connection that will prevent future problems.

If the electrical problem is due to a faulty component, the electrician will isolate it by separating it from other devices. They will then examine the input and output signal values to determine what is wrong with it.

Residential rewiring is an extensive job that requires special tools and skills to complete. The electrician will need to access the walls by drilling numerous holes in drywall and may have to rip out old wires from the wall, which can be time-consuming. Some older homes have aluminum wiring that can be a fire hazard. If this is the case, an electrician will need to replace it with copper or another safer material. They can also install a new breaker panel with additional branch circuits to serve areas of high electricity usage and prevent overloading.

Installing Light Fixtures

When it comes to sprucing up the look of your home, lighting is one of the easiest ways to do so. Although replacing an existing light fixture isn’t a project for novice do-it-yourselfers, it is a job most people can handle with careful preparation and attention to safety protocols.

Before beginning any electrical work, turn off the power at your circuit breaker using the switch in the room you’re working in. If you’re unsure which switch to flip, consult your home’s electrical panel and look for labels that indicate which breakers serve which rooms. Once the power is off, remove any decorative pieces or plates that cover the junction box and the hardware for your old light fixture. Look for a plate with a screw that holds the fixture in place; this can usually be removed, exposing the capped wiring inside the ceiling.

Once you have access to the wiring, use your voltage tester to ensure that there is no current running through the wires. If the capped wires are not labeled, note where the black, white, and copper (or green) wires connect to each other by writing down or taking a picture. You’ll need this information to install your new light fixture.

Once the new fixture is installed, you can turn the breaker back on and enjoy your newly illuminated space. Remember to replace the bulb with an appropriate wattage to avoid overheating, which can not only damage your fixture but also ignite nearby combustible surfaces. If you’re unsure which wattage to use, consult your new fixture’s instructions and the UL or NRTL listing on the label. A residential electrician can also advise you on the best wattage for your fixture.

Installing Appliances

If you’re a homeowner, there will come a time when you need to replace your appliances. Whether it’s your washer, dryer, or refrigerator, it can be a big project that requires proper attention to detail. While it is possible to install these large appliances yourself, it’s always better to enlist the help of a professional to ensure that everything is done correctly and safely.

The main responsibility of a residential electrician is to work on electrical wiring and outlets in houses and apartment buildings. This includes installing new wiring and fixtures, as well as troubleshooting and repairing existing ones. They also inspect these components to make sure they are up to code and safe to use.

There are over 20 different types of electricians, each with their own specializations and qualifications. A residential electrician, for example, works on homes and apartment buildings, while a commercial electrician is more likely to be found in offices, malls, and other large facilities.

Both types of electricians can wire a building, but it’s important to understand the differences between the two to determine which one is best suited for your needs. Residential electricians work with lower voltage systems and are more familiar with the requirements of home living. Commercial electricians work with higher voltages and are more familiar with the demands of larger spaces.

Regardless of the type of job, there are some common steps that all electricians follow to complete their work. For example, they always take safety seriously and don’t work alone. This helps to protect them from potential hazards, including electrocutions and other accidents. It’s also important to have the right tools for the job and to wear appropriate clothing.